Skip to content ↓
More in this Section

Microsoft Teams

UVHS will be providing online learning resources if there is another period of school closure. Please see below the 'UVHS Online Student Support' presentation that details how we aim to support students.

Please note: the student planner contains instructions and advice for using Teams.

If you have any issues logging into Microsoft Teams please contact our support team: teams@uvhs.uk

The Teams website address is: https://teams.microsoft.com

Download the Teams App for Desktop here.

 Homework

Accessing your homework on Microsoft Teams

Please download the Microsoft Teams App to your device. Windows, Apple and Android are all supported. Either scan the QR code below or select the appropriate link.  


Please Visit https://teams.microsoft.com. Log in using your school email address and school password. Your email will look like: 15xx1234@pupil.uvhs.org.uk, your school username with @pupil.uvhs.org.uk added.


Choose the team/class you wish to enter. A red dot indicates something is available in the team.


Choose the Assignments tab


Choose the assignment you wish to complete, the poem authoring assignment is due tomorrow, so I chose this.


Read your teacher’s instructions, in this case, they want you to create a word document and upload it, to hand it in. But this could be a presentation, excel workbook, PDF, photograph, etc.


Create the Word document and save it on your computer (or OneDrive if you know how)


Go back to the assignment in teams (Steps 1-4) and choose + Add Work


Upload from the place you saved the work. OneDrive if you saved it there, or Upload from this device if you saved it to your computer.

Once you have uploaded your completed work you will see the file at the bottom of the assignment, you can then Hand it in using the button at the top right.


Once you press Hand In you will see a small animation and the Hand in button will change to the following and the teacher has your work.

In this example, a worksheet has been provided and each member of the class can edit their own version of the file to hand back in.

To open the worksheet, click on the ellipsis (Three dots) to the right of the filename. Choose one of the three bottom options (Open in Word, Open in Word Online or Download) . Open in Teams has been advised against by
Microsoft for the present.

If you choose to open in Word or Word Online changes are saved straight back to the assignment and when you are happy, you can Hand in the work, see step 8.


If you download the file, you will need to upload the file again, see step 7.


 Installing Office at home

Click on this Students and Staff link. Alternatively go to the school website homepage and click on the Students and Staff link :


Click on the Get Office Professional Plus link which is available in both the Student Links and Staff Links pages.

Sign in with your school email address and password.


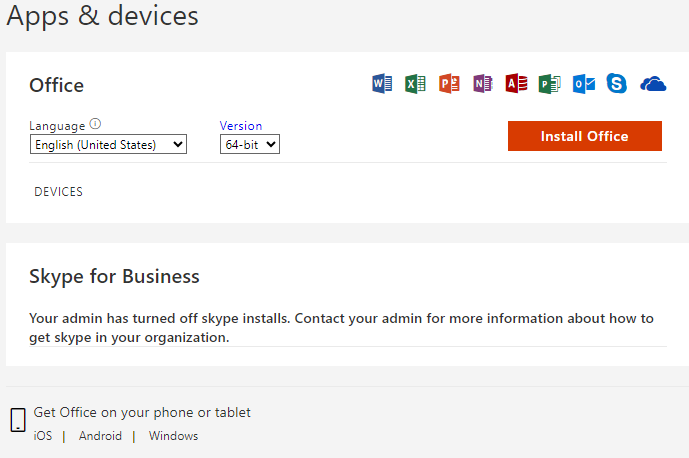
On the Office page click on Install.


 Using OneDrive

OneDrive for Business is part of the Office 365 service. It provides 1Tb of cloud based storage. To access your OneDrive for Business login to your Office 365 account at:

https://login.microsoftonline.com/

Use your school email address and password.

Once logged in select the OneDrive icon.


This will open the OneDrive app.


Use the New option to create a new folder or office document.

Use the Upload option to upload files or folders from your device.

Files and folders can also be dragged from your device and uploaded.

To download a file or folder, make sure that it is selected and click Download.

Folders will be downloaded as a zip file. To delete a file or folder, make sure that it is selected and click Delete.

How to join a live lesson

When a live lesson is added in Teams for you, you will receive this information in several different ways.


Email – an invitation will be sent to your school email. If you keep Outlook open at all times when using Teams, you will receive alerts before the lesson is due to start. To join the live lesson, at the time of the lesson, click on the purple link “Join Microsoft Teams Meeting” to take you to the meeting join dialogue, then see Step 5


Teams Calendar – click on the Calendar button in Teams. You will see the live lesson listed in your Teams Calendar. When it is time to join the live lesson, click on the lesson in the calendar and choose join which takes you to meeting join dialogue. See Step 5


Teams Chat – within the class team chat you will see the live lesson details listed. Click on the lesson and then join and it will take you to the meeting join dialogue. See Step 5


Once at the Join Dialogue Screen, it is good practice to mute your microphone when joining a lesson by pressing the mute button. You can then join the meeting by pressing “Join Now”.


Your teacher will explain how the lesson will proceed.


Remote Support
 

If you are having problems with Teams at home we may be able to offer remote support by connecting to your computers desktop, if so we will use one of two systems. 

On Windows 10 we will ask you to open the pre-installed Quick Assist app.  Once open we will give you a 6-digit code to enter, we will then be able to view or control your screen.

On other operating systems (or Windows 10 where Quick Assist won't work), we will use TeamViewer, only download this when requested to do so. The download links are on their website here: https://www.teamviewer.com/en/info/quicksupport/

Clearing the Teams Cache
 

Over time, the temporary files that Teams keeps, known as the cache, can build up and become corrupt.  When Teams starts behaving unexpectedly, it is a good idea to clear this cache.  The instructions for doing so vary, based on the type of device you are using.

Windows Computers/Laptop
  1. If Teams is still running, right-click the Teams icon in the taskbar, and then select Quit.
  2. Open the Run dialog box by pressing the Windows logo key  +R.
  3. In the Run dialog box, enter the following line and then select OK.

    %appdata%\Microsoft\Teams

  4. Delete all files and folders in the %appdata%\Microsoft\Teams directory.
  5. Restart Teams.
Apple Mac Computers / Laptops
  1. If Teams is still running, right-click the Teams icon in the dock, and then select Quit, or press Command (⌘)-Q.

  2. In the Finder, open the /Applications/Utilities folder, and then double-click Terminal.

  3. Enter the following command, and then press Return:

    rm -r ~/Library/Application\ Support/Microsoft/Teams

  4. Restart Teams.

Chromebook / Chrome Browser
  1. Open Teams in the browser

  2. Click on the padlock icon in the address bar.

  3. From the menu, click on Site settings.

  4. Select Clear data

  5. Restart your browser and open Teams in the browser

Apple iPhone/iPad
  1. Open the Settings app on your device and tap on General.

  2. Choose either iPhone storage or iPad storage as applicable

  3. Locate and choose the Teams app.

  4. Choose offload

  5. Optional: if offload doesn't work, then you can repeat 1 - 3 and choose to delete the app and re-install it.

Android Phone/Tablet
  1. Open Settings on your phone and go to Apps. Scroll down and choose the Teams app.

  2. Select the Storage option.

  3. Finally, click the Clear cache button.

  4. Optional: if Clear cache doesn't work, repeat 1 and 2 and choose Clear data.

Edge Browser
  1. Copy the line below and paste into your address bar at the top of the browser:

    edge://settings/cookies/detail?site=teams.microsoft.com

  2. Choose Remove all